In the part one of these series we have checked what PhoneGap mobile application framework is, downloaded its latest version and have created our initial first project for iOS smartphone platform. I have also outlined frame for example mobile app we are going to build and the set of web APIs that we will be using to make this example application somewhat useful for its users.
In this part of the tutorial we will take a closer look to PhoneGap framework structure, its main files and will write code to consume data from the web based APIs. Lets call it slightly advanced “Hello World” example which instead of printing just simple text will display 5 yummy receipts retrieved from external web service.
We will continue working on the code of the initial project created in the part one of this tutorial. You can follow the steps we took last time, they are quite simple.
As we have much more code in this part, the all source code for today’s finished tutorial is located at the bottom of the post. Feel free to download and use it for testing. Now, lets get started.
PhoneGap structure for iOS mobile project
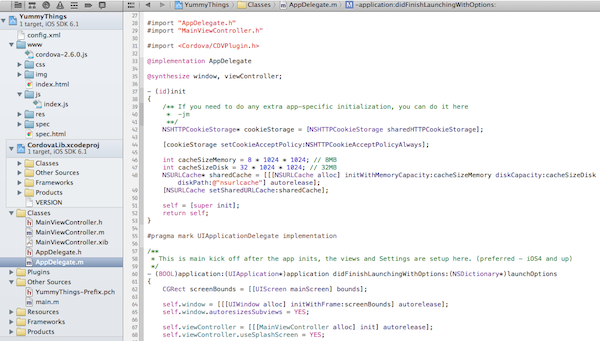
Let’s take a look at the structure and contents of the project created by PhoneGap script. Open the project with XCode (key tool for developing iOS based mobile applications). The structure will look the same as I have pictured below, with the key files for iOS project as well as PhoneGap specific www directory and few configuration files.
For iOS apps main.m objective-c implementation file represents the main loop application is constantly running. From the contents of this file we see that AppDelegate is being referenced as a main controller. Quick view to AppDelegate.m implementation file shows us that it sets some configuration parameters for the mobile project. Cache size, window size, splash screen, default start page for view controller (project default is always index.html) and other properties. The main directory where all application files have to be placed is www and they will be served via special custom view (web view).
AppDelegate.m implementation file for newly created PhoneGap iOS project.

At this time we don’t need to touch anything in the project setup, as we are quite happy with default settings and index.html being the start view for our mobile application. And in PhoneGap world its preferable to change settings via config.xml (it lists plugins and preferences for specific project) as opposed to tweaking objective-c implementation files.
Next we take a closer look at the source of main project file index.html as this is our start view. We see standard HTML5 markup code and the most interesting portion of the code where we are importing JavaScript files.
<script type="text/javascript" src="cordova-2.6.0.js"></script>
<script type="text/javascript" src="js/index.js"></script>
<script type="text/javascript">
   app.initialize();
</script>
We need cordova version specific .js file as well as index.js. These 2 are providing all the functionality to the project. JavaScrip file with Cordova version in the name is warping up all PhoneGap framework code written in OS native language and enables JavaScript APIs for our use. index.js file is implementing these APIs. app.initialize(); for example is the call to function created in index.js:
 var app = {

    // Application Constructor
    initialize: function() {
        this.bindEvents();
    },
    // Bind Event Listeners
    //
    // Bind any events that are required on startup. Common events are:
    // 'load', 'deviceready', 'offline', and 'online'.
    bindEvents: function() {
        document.addEventListener('deviceready', this.onDeviceReady, false);
    },
    // deviceready Event Handler
    //
    // The scope of 'this' is the event. In order to call the 'receivedEvent'
    // function, we must explicity call 'app.receivedEvent(...);'
    onDeviceReady: function() {
        app.receivedEvent('deviceready');
    },

    // Update DOM on a Received Event
    receivedEvent: function(id) {

        var parentElement = document.getElementById(id);
        var listeningElement = parentElement.querySelector('.listening');
        var receivedElement = parentElement.querySelector('.received');

        listeningElement.setAttribute('style', 'display:none;');
        receivedElement.setAttribute('style', 'display:block;');

        console.log('Received Event: ' + id);
    }
};
Above is the code from index.js and its quite self explanatory. During the initialize phase we have to bind to events and assign functions to be executed once these events fire. The full list of supported events can be found in PhoneGap documentation. At this time we only are interested in deviceready event and are going to come back to this part of code later to catch events once our mobile application will go to background state, will be retrieved from background state or will loose internet connection.
According to PhoneGap documentation deviceready event is fired once PhoneGap has fully loaded all required code, DOM and JavaScript. After this event we know that app PhoneGap JavaScript APIs are fully available to use.
Adding simple alert message
As a test lets add simple alert message to our iOS application which is displayed once application is started and PhoneGap JavaScript API are ready. For this we need to make sure that config.xml has Notification plugin enabled (by default it does) and add the following code to index.js to receivedEvent section after deviceready has fired.
// Callback function for dismissed alert
function alertDismissed() {
  // do something
}

navigator.notification.alert(
       'DOM and JavaScrip have loaded!!',  // message
       alertDismissed,                     // callback
       'YummyThings Hello World',          // title
       'I know'                            // buttonName
);
If you run your project now it will display alert once application is fully loaded and ready to function.
More about elements for notification.alert you can read in documentation section.
Webservices, Webservices
Now once we have some understanding about the key elements of PhoneGap based mobile application lets add functionality for consuming web API based data and for displaying received information.
Being able to communicate with web based servers and devices is now becoming the key requirement for any useful mobile application. In the part 1 of this tutorial we decided to use Yummly.com API’s for retrieving recipes based on the ingredients our mobile application users like.
Consuming data from 3rd party web services in most cases requires to obtain API credentials and authenticate your API calls by using them. Therefore its a common security practice for mobile app developers not to store such API credentials in the actual mobile application.
In our project we are going to do just that. In the simplified way for this tutorial (but before you go live with your project, make sure your server side code runs securely). I have created the following simple PHP script to represent your server side code.
<?php

// Get what's being sent to us

if ($_GET['q']) $question=$_GET['q'];
if ($_GET['requirePictures']) $rpictures=$_GET['requirePictures'];

////////////////////////////////
// API credentials /////////////

// TODO: please obtain API credentials form developer.yummly.com
$appid = "xxx";
$appkey = "xxx";

// Number of itens in response
$returnitems = 4; //will give us back 4+1=5 items

// Building string for GET request
$requeststr = "http://api.yummly.com/v1/api/recipes?";

$requeststr=$requeststr."_app_id=".$appid;
$requeststr=$requeststr."&_app_key=".$appkey;

$requeststr=$requeststr."&q=".$question;
if ($rpictures) $requeststr=$requeststr."&requirePictures=".$rpictures;

// Debug
//echo $requeststr

// CURL for communicating with web service

$ch = curl_init();
curl_setopt($ch, CURLOPT_URL,$requeststr);
curl_setopt($ch, CURLOPT_VERBOSE, 1);

curl_setopt($ch, CURLOPT_SSL_VERIFYPEER, FALSE);
curl_setopt($ch, CURLOPT_SSL_VERIFYHOST, FALSE);

curl_setopt($ch, CURLOPT_RETURNTRANSFER,1);

$response = curl_exec($ch);

// We can do some heavy lifting on the server side
// and send back already prepared html from only the elements
// we need.
$response_decoded = json_decode($response, true);

$returnstring = "";

for ($i=0; $i<=$returnitems; $i++) {

  $returnstring = $returnstring."<p><img src='".
  $response_decoded['matches'][$i]['smallImageUrls']['0']."' />Recipe Name: ".
  $response_decoded['matches'][$i]['recipeName'].", it has ".count($response_decoded['matches'][$i]['ingredients'])." ingridients.</p>";
}

echo $returnstring;

?>
If you are not a PHP guru, what this code does – it accepts incoming request from mobile client (with the list of ingredients – no sensitive data being sent over the network), uses received data to make a API call to 3rd party web service, parses received JSON response and returns 5 results wrapped into HTML markup code (not bad for PHP 60 liner, huh?). Feel free to copy this code to your server, or write similar functionality in the programming language you know best. The beauty of web services is that functionality is not dependent on programming language being used.
Making HTTP call from PhoneGap application
Next is our PhoneGap mobile application code. We have to make a HTTP call to our back end server, pass the values of ingredients selected by app user and receive prepared markup with number of responses. We are going to employ one of the most popular JavaScript libraries to do this work for us. I’m talking about jQuery library which is much loved by many web developers and makes great fit for hybrid mobile applications. Download the library and add it to your project by importing in index.html
<script type="text/javascript" src="js/jquery.js"></script>
The following code is added to main index.html file
<script type="text/javascript">
  app.initialize();
</script>

<script type="text/javascript">
$( document ).ready(function() {
  $(".share").click(function (e) {
    $('.content').toggleClass('show');
    e.preventDefault();
  });
});
</script>

<script type="text/javascript" charset="utf-8">

function callWebService(){

  // We don't want API call to be made and data refreshed
  if ($('#yummy').is(':empty')){

    // Adding spinner image until we will get response
    $("#yummy").append("<img class='spinner' src='img/loadinfo.net.gif' />");

    var question = $("#question").val();

    // Log
    console.log("Questions value: " + question);

    //create request url
    var url = "http://your.test.server.url/?q=" + question + "&requirePictures=true";

    // Log
    console.log("Request string: " + url);

    // Call to web server
    $.get(url, function(data) {

    // Clear spinner
    $("#yummy").empty();

    // Add results to HTML
    $("#yummy").html(data);

    // Log received content
    console.log("Received string: " + data);

  }
 );

} // end if

}//end of method

</script>

<div id="menu">
<input id="question" type="text"></input>
<div type="button" onclick="callWebService()" id="webservice_call">Find recipes</div>
<div id="yummy"></div>
</div>
Lets split above code into parts. First I’m using app.initialize() PhoneGap function to initialize all framework JavaScript API’s (even if in this tutorial part we are not really using them). Next I have code which displays drop down menu on the click of the button with id="webservice_call" on the click. This element will not only extend drop down menu, but once clicked will execute another function callWebService(). In it I’m preparing request string to be send to our back end server (by taking input value of text element with id="question"), displaying spinning image until we receive results for our API call and populating drop down list with received values once we get them. I’m using console.log() function in many places to print variable values to the console simply for debugging purposes.
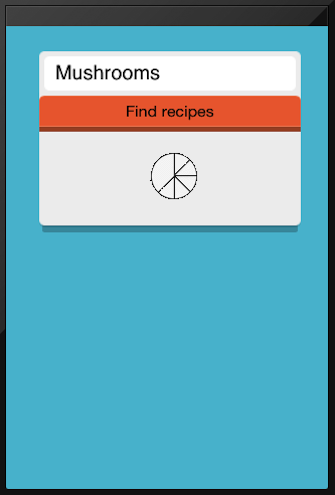
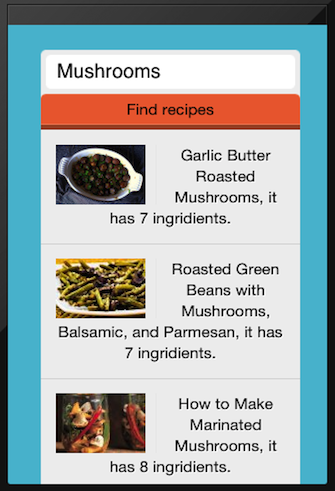
To make our test project UI look beautiful I have reused some of the styles and markup from previous tutorials here on htmlcenter. Once compiled and run this is how our PhoneGap mobile project looks now.
The resulting print screens of loading results and finished recipe list


We did a lot of work in this tutorial (well done! for reaching this far) and now have created PhoneGap based mobile application which can consume content from external web servers and display results within iOS view. Similar technique can be used to dynamically change larger portions of mobile application content or styles (load them remotely from your back end if there were any changes made).
Whats next
This is the end of tutorial part 2. In the next part of this tutorial we are adding even more functionality: Local storage and Native Controls. I’m looking forward for any questions, comments and feedback, you can leave them in the comments area under the post or reach out to me on Twitter.
Full source code for what we have done so far can be found and downloaded here. Have fun!
18 Responses
Thanks a lot!
You are welcome Mykola
Thanks for the great article on developing phonegap.
Glad it helped
Nice articles and very helpful for developing application..
thanks a lot.
Thanks!
Hey great article. Just one important question, how to setup the php file on the server. I am new to this so have little/no knowledge about this. Please help Thanks
Hi Bibhas, in order to run host php files you have to upload them to the web server which supports php. bunch of them out there, just google php hosting. As for php itself, here is the beginners guide
Nice articles and very helpful for developing application; but i have a probleme to connecte my application android with a
index.php, this a consolelog returned to mehello hakim, glad to hear that our tutorials are useful!
as for the error you get, it seams that you have the variable in your code which is maybe mistyped?
maybe
resqustvariable should be something different?Hi Saul,
Thank you for this fantastic tutorial!! ;)
I’m a begginer in phonegap and I have found a small problem that I don’t know why it happen.
javascript is only working in my index.html. Even some basic commands like
Do you know why? thank you very much! :)
Hi Manuel, can you post some example code you are using to for JavaScript alert which is not working?
Could you please explain the deal with the php file. I host it in my host and then where in the code i point it?
Second question, my web service is not getting the recepi, is just in constant load ??
hi viganella,
not sure I fully understand your questions.
php example in tutorial creates / sends request to api.yummly.com and responds back with HTML to be displayed in MobileGap application. you have to upload it to your web server and point the PhoneGap application to it. Check another code block in the tutorial.
not sure what do you mean by constant load for your web service. can you give more details?
Learnt a lot from this tutorial. Thanks alot!
glad to hear it helped!
Am glad to hear from you. Have some questions to ask now that I know you attend to comments.
I want to develop a hybrid app with PhoneGap that works both online and offline. I want the user to be able to access the app when offline and when he goes online, new update from the database should be able to synchronise with the app. My questions are:
1. Can I use MySQL database on my server?
2. How do I interface the info in the database of my server with the phone storage?
3. Does it mean that my php files will be on the server while the html will be wraped by phoneGap as hybrid app?
4. How do I ensure proper syncronization between data in the app and the one in the database in the server?
Hi,
Bunch of good questions.
You hybrid app can store data in HTML5 local storage while its offline. And in order to synch the data once app is back online you can add event listener if you are using PhoneGap as a wrapper. Something like this will do it:
document.addEventListener("online", onOnline, false);Once this is triggered you could sync you local data with central database.
Now about MySQL.
I’m sure you could use this or other relational database for storing data. But once you think about mobile apps and scalability (multiple copies of your app running simultaneously) performance becomes an issue.
You will need proper queueing solutions etc.
There are few databases out there which will allow your application to store data locally on mobile device and then they will take care of sync’ing data with central DB once back online. PouchDB is one of them and it works with using Apache CouchDB as a central server. I would recommend you to take a look at this:
http://pouchdb.com
Actually this might be a good subject for extensive tutorial on HTMLCenter. Will se what we can do :)